
Meta-pipelines - Part 5 - Automating the Host Environment
20 Sep 2019 - Giulio Vian - ~7 Minutes
Looking back at the previous parts of this series, we have been able to manually setup two hosts, a Windows one and a Linux one, and a simple pipeline to automatically deploy new Azure DevOps/TFS Agents in Docker containers on such hosts and even update them.
In this post we will look how to provision the hosts themselves. For this purpose we will use Terraform and invoke it from Azure Pipelines so we can automate host creation in Azure.
If you need a Terraform primer there is plenty of resources, from the excellent Terraform: Up & Running to the official documentation , Pluralsight courses, etc. I recommend to have at least a cursory knowledge of Terraform and Azure before delving deeper.
Blueprinting
Terraform will provision the virtual machines to host our Docker containers. The full source code is in the repository , here we will highlight and comment some major points to avoid listing all 500+ lines of code.
Note that I used Terraform 0.12 which allows for a different, more elegant language grammar.
Azure Architecture
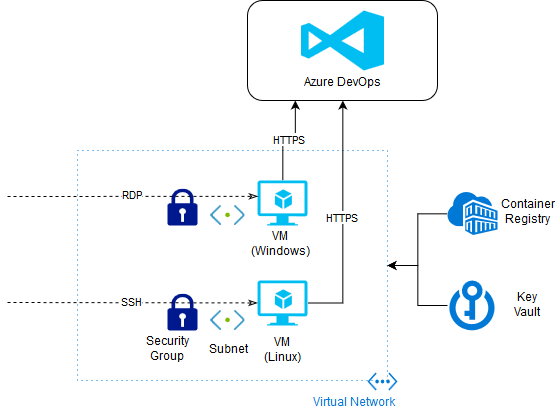
The blueprint will have a Resource Group for these Hosts, two sets of Virtual Machines (VMs), one for Windows, one for Linux, an Azure Container Registry to store the agent images and a Key Vault for passwords and certificates.
Terraform needs a Service Principal (SP for short), a type of Azure Active Directory (AAD) account, to authenticate. The simplest way to create one is using Azure CLI or Azure PowerShell .
By running similar commands, create the SP. Take note of the output values for Terraform.
az account list
# take note of output, e.g.
#   [
#     {
#       "cloudName": "AzureCloud",
#       "id": "9cc84c88-b440-42ee-8847-89249a7d67c2",
#       "isDefault": true,
#       "name": "My Magic Azure Subscription",
#       "state": "Enabled",
#       "tenantId": "c6f5c7b6-353c-4af6-8d95-314c58f1fec2",
#       "user": {
#         "cloudShellID": true,
#         "name": "live.com#my_msa_account@outlook.com",
#         "type": "user"
#       }
#     }
#   ]
#
#   id          -> AZURE_SUBSCRIPTION_ID
#   tenantId    -> AZURE_TENANT_ID
az ad sp create-for-rbac --name AggregatorSPLimitedToTestRG
# take note of output, e.g.
#   {
#     "appId": "56f7583c-4165-43c5-8311-f2e671aa1fdd",
#     "displayName": "MyTerraformServicePrincipal",
#     "name": "http://MyTerraformServicePrincipal",
#     "password": "************************************",
#     "tenant": "c6f5c7b6-353c-4af6-8d95-314c58f1fec2"
#   }
#   appId       -> AZURE_CLIENT_ID
#   password    -> AZURE_CLIENT_SECRET
#   tenant      -> AZURE_TENANT_ID
These scripts are controlled by a number of variables, described in the next table.
| variable | use | default |
|---|---|---|
| env_name | Name of Environment | pyp-demo |
| resource_group_location | Azure Region of resources | westeurope |
| acr_sku | SKU of Azure Container Registry | Basic |
| num_windows_hosts | Number of Windows VMs | 1 |
| num_linux_hosts | Number of Linux VMs | 1 |
| vm_size | Size of VMs (1) | Standard_B1 |
| vm_disk_type | Type of disk storage for VMs (1) | Standard_LRS |
| vm_admin_username | Username for the Administrator account | hostadmin |
| vm_public_access | If true the Security Groups allow RDP and SSH access to the VMs | false |
| azuredevops_pat | Azure DevOps Personal Access Token (2) | — |
| azuredevops_url | Azure DevOps URL | — |
| azuredevops_pool_hosts | Azure DevOps Pool for Hosts | — |
(1) Default size is the cheapest, which may not be adequate for production usage. (2) Must have Read & Manage permission at Agent Pools scope.
Additional tuning requires changing the Terraform source code.
Some resource names are global to the whole Azure because they become part of DNS names; in our case the Registry (ACR) and KeyVault must be unique. To guarantee this we add a random 6 character string to the base name; in addition punctuation symbols are forbidden. Here is the code for it.
resource "random_id" "env_name" {
  keepers = {
    env_name = var.env_name
  }

  byte_length = 3
}

locals {
  env_name_nosymbols = replace(replace(var.env_name, "-", ""), "_", "")
  name_suffix        = random_id.env_name.hex
}

resource "azurerm_container_registry" "pyp" {
  name                = "${local.env_name_nosymbols}${local.name_suffix}"
  #...omissis...
}
resource "azurerm_key_vault" "pyp" {
  name                = "${local.env_name_nosymbols}${local.name_suffix}"
  #...omissis...
}
The keepers argument ties the generation of a new random number to env_name value. Only if this latter changes, a new number is generated.
To configure the virtual machines we use an initialization script: windows-setup.ps1 and ubuntu-setup.sh.
They are similar in following these steps:
- Preparing the data disk
- Installing Docker
- Reconfiguring the Docker daemon to use the data volume for its operations
- Install PowerShell 6 & Git
- Install and configure the Azure Pipelines Agent
Launching Windows setup
The fragment that launches the setup script uses OOBE, a native Windows mechanism for initial OS configuration.
resource "azurerm_virtual_machine" "windows_vm" {
  os_profile {
    # CAVEAT: Careful to stay within 64 KB limit for the custom data block
    custom_data = "Param($AZP_URL='${var.azuredevops_url}',$AZP_TOKEN='${var.azuredevops_pat}',$AZP_POOL='${var.azuredevops_pool_hosts}') ${file("${path.module}/scripts/windows-setup.ps1")}"
  }

  os_profile_windows_config {
    # Auto-Login's required to configure machine
    additional_unattend_config {
      pass         = "oobeSystem"
      component    = "Microsoft-Windows-Shell-Setup"
      setting_name = "AutoLogon"
      content      = "<AutoLogon><Password><Value>${random_string.vm_admin_password.result}</Value></Password><Enabled>true</Enabled><LogonCount>1</LogonCount><Username>${var.vm_admin_username}</Username></AutoLogon>"
    }

    additional_unattend_config {
      pass         = "oobeSystem"
      component    = "Microsoft-Windows-Shell-Setup"
      setting_name = "FirstLogonCommands"
      content      = file("${path.module}/scripts/FirstLogonCommands.xml")
    }
  }
  # ... omissis ...
path.module translates to the directory where the Terraform source is located.
FirstLogonCommands.xml lists a few actions to take, the last one launches our powershell script.
<FirstLogonCommands>
    <SynchronousCommand>
        <CommandLine>cmd /c "mkdir C:\terraform"</CommandLine>
        <Description>Create the Terraform working directory</Description>
        <Order>11</Order>
    </SynchronousCommand>
    <SynchronousCommand>
        <CommandLine>cmd /c "copy C:\AzureData\CustomData.bin C:\terraform\windows-setup.ps1"</CommandLine>
        <Description>Move the CustomData file to the working directory</Description>
        <Order>12</Order>
    </SynchronousCommand>
    <SynchronousCommand>
        <CommandLine>powershell.exe -sta -ExecutionPolicy Unrestricted -file C:\terraform\windows-setup.ps1</CommandLine>
        <Description>Execute the System Configuration script</Description>
        <Order>13</Order>
    </SynchronousCommand>
</FirstLogonCommands>
This technique works fine in simple scenario like ours, which uses small script, as the custom_data has a hard limit of 64KB.
Windows setup
The script is long but trivial; one interesting line is the Docker storage-opts configuration parameter tuned for Windows images, typically bigger than Linux images.
'{ "data-root": "F:\\docker-data", "storage-opts": ["size=120GB"] }' | Out-File -Encoding Ascii -Filepath "C:\ProgramData\docker\config\daemon.json"
Restart-Service docker
Launching Linux setup
Linux VM in Azure cannot use custom data and should go for
Custom Script Extension
instead. This translates to the azurerm_virtual_machine_extension Terraform resource.
I opted for the script property, fed by a template file base-64 encoded, to avoid managing upload of scripts and storage handling.
  protected_settings   = <<PROTECTED_SETTINGS
    {
      "script": "${local.ubuntu_setup_base64}"
    }
PROTECTED_SETTINGS
Linux setup
This script has a few tricks:
set -eto fail at first error and-xto log every commandblockdev --rereadptto make the new partitioned disk visible-qq -o=Dpkg::Use-Pty=0to minimize apt-get loggingexport DEBIAN_FRONTEND=noninteractiveto avoid prompting from apt-getexport AGENT_ALLOW_RUNASROOT=1
${…} expression are evaluated by Terraform: this means that the file has secrets in plain text.
Applying the blueprint
With the Terraform code in hand, we need something to run it with the proper configuration. What’s better than an Azure Pipeline? Great! The requirement list includes:
- the Hosted Agents has Terraform, but we need the latest 0.12
- credentials for Terraform remote state
- Azure credentials to pass on to Terraform
- values for Terraform variables
- settings to pass the new agent so it can connect to Azure Pipelines
This is how each requirement is handled:
- the
Terraform Installer Task
makes sure that the right version of Terraform is installed and the
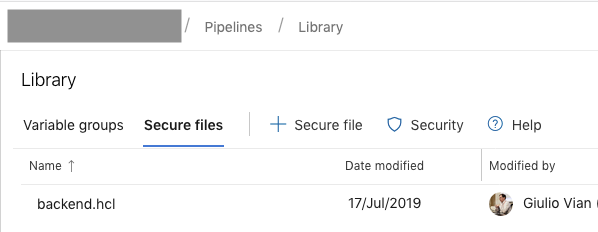
TERRAFORM_VERSIONsays which version backend.hclis a secure file configures Terraform remote state
workspaces {
  prefix = "pyp-"
}
hostname     = "app.terraform.io"
organization = "myorganisation"
token        = "**************"
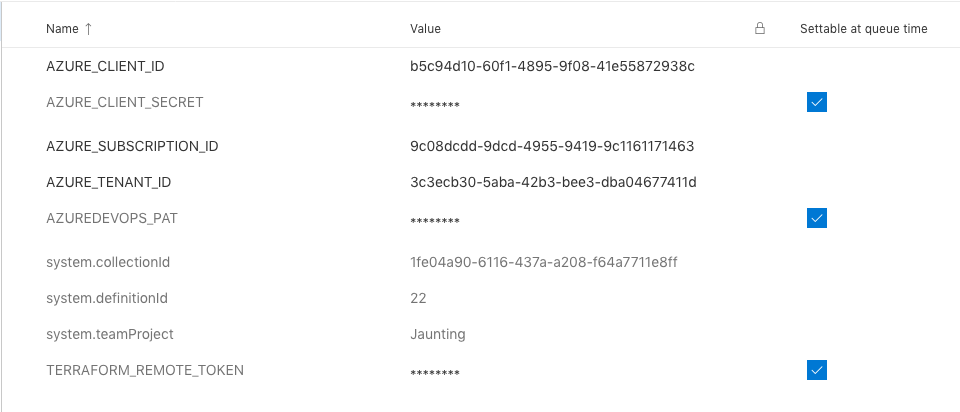
- Four variables (
AZURE_SUBSCRIPTION_ID,AZURE_TENANT_ID,AZURE_CLIENT_ID,AZURE_CLIENT_SECRET) defines the Azure credentials for Terraform, see Argument - Two variables
AZUREDEVOPS_PATandPIPELINE_POOLconfigures the agent - the remaining variables set Terraform variables
Here is the Yaml pipeline
variables:
  TERRAFORM_VERSION: '0.12.3'
  TERRAFORM_WORKSPACE: 'dev'
  TF_IN_AUTOMATION: true
  # these variables are commented to remind that they must be defined through the web interface and marked secure
  # TERRAFORM_REMOTE_TOKEN: ''
  # AZURE_SUBSCRIPTION_ID: ''
  # AZURE_TENANT_ID: ''
  # AZURE_CLIENT_ID: ''
  # AZURE_CLIENT_SECRET: ''
  # AZUREDEVOPS_PAT: ''
  PIPELINE_POOL: 'MakeAgents'
  ENV_NAME: 'pyp-demo'
  RESOURCE_GROUP_LOCATION: 'northeurope'
  ACR_SKU: 'Basic'
  NUM_WINDOWS_HOSTS: 1
  NUM_LINUX_HOSTS: 1
  VM_ADMIN_USERNAME: 'hostadmin'
  VM_SIZE: 'Standard_B2s'
  VM_DISK_TYPE: 'Standard_LRS'
  VM_PUBLIC_ACCESS: true

steps:
- task: DownloadSecureFile@1
  inputs:
    secureFile: 'backend.hcl'
- task: charleszipp.azure-pipelines-tasks-terraform.azure-pipelines-tasks-terraform-installer.TerraformInstaller@0
  displayName: 'Install Terraform $(TERRAFORM_VERSION)'
  inputs:
    terraformVersion: '$(TERRAFORM_VERSION)'
- script: |
   terraform init -no-color -input=false -backend-config="$(Agent.TempDirectory)/backend.hcl"
   terraform apply -no-color -input=false -auto-approve
  workingDirectory: '$(System.DefaultWorkingDirectory)/src/hosts/terraform'
  displayName: 'Terraform apply in $(TERRAFORM_WORKSPACE) workspace'
  env:
    # forward variables to Terraform
    TF_WORKSPACE: $(TERRAFORM_WORKSPACE)
    TF_VAR_azurerm_subscription_id: $(AZURE_SUBSCRIPTION_ID)
    TF_VAR_azurerm_tenant_id: $(AZURE_TENANT_ID)
    TF_VAR_azurerm_client_id: $(AZURE_CLIENT_ID)
    TF_VAR_azurerm_client_secret: $(AZURE_CLIENT_SECRET)
    TF_VAR_azuredevops_url: $(System.TeamFoundationCollectionUri)
    TF_VAR_azuredevops_pat: $(AZUREDEVOPS_PAT)
    TF_VAR_azuredevops_pool_hosts: $(PIPELINE_POOL)
    TF_VAR_env_name: $(ENV_NAME)
    TF_VAR_resource_group_location: $(RESOURCE_GROUP_LOCATION)
    TF_VAR_num_windows_hosts: $(NUM_WINDOWS_HOSTS)
    TF_VAR_num_linux_hosts: $(NUM_LINUX_HOSTS)
    TF_VAR_vm_admin_username: $(VM_ADMIN_USERNAME)
    TF_VAR_vm_size: $(VM_SIZE)
    TF_VAR_vm_disk_type: $(VM_DISK_TYPE)
    TF_VAR_vm_public_access: $(VM_PUBLIC_ACCESS)
    TF_VAR_acr_sku: $(ACR_SKU)
This pipeline may looks complex but it is just four activities:
- Download the file with Terraform remote configuration
- Get the correct version of Terraform
- Run
terraform init - Run
terraform apply
Terraform init is the first command to run before any other meaningful command can be used: it downloads providers used in code and configures state. State must be remote (by default uses a local file) as the machine running this pipeline can change at each execution. I used the recently announced Remote State Management feature of Terraform Cloud, but you can change to Azure Storage as well. apply does all the heavy lifting, comparing the definitions in Terraform source code and the resources in Azure.
Wow, we have a pipeline that deploy hosts to run pipelines that deploy docker containers to run the usual build pipelines!
Secrets
One note of caution: in this example secrets and password are accessible reading environment variables and saved in clear text in TF State.