Increment Version for Changed Assemblies only – Third Part
28 Apr 2014 - Giulio Vian - ~4 Minutes
This is the third and last installment of the series: in the First post we examined the basics of extending the MSBuild / Visual Studio process, and in the Second part how to extend the Team Foundation Server Build, so that the minimum set of assembly is recompiled and gets the version updated. The limit of the latter solution is in the version number appearing in the assemblies: they have no relation with build identifiers. Let’s see how to solve this.
Identifiers and version numbers
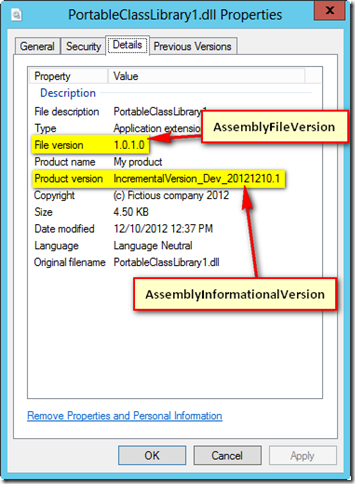
The default TFS Build Identifier contains some numbers that cannot be directly used as file version numbers (e.g. MyBuild_20140409.1). Our objective is depicted in this snapshot.
File and Assembly version numbers are limited in range from 0 to 65535 for the Build and Revision parts, so the default Build number format $(BuildDefinitionName)\_$(Date:yyyyMMdd)$(Rev:.r) cannot be used. A better choice is $(BuildDefinitionName)_$(Year:yy)$(DayOfYear)$(Rev:.r): it will work until 2065 included.

Correlating identifiers in TFS 2013
The Build identifier is calculated during the build execution, in the Update Build number activity. To get this value, in TFS 2013, you can just read the value from the TF_BUILD_BUILDNUMBER environment variable, like in the following code for the autoIncrTfs2013.targets file (see
previous post
).
<?xml version="1.0" encoding="utf-8"?>
<Project xmlns="http://schemas.microsoft.com/developer/msbuild/2003">
    <Import Project="$(MSBuildExtensionsPath)\Microsoft\ExtensionPack\MSBuild.ExtensionPack.VersionNumber.targets"/>
    <Target
    Name="BeforeCompile"
    Inputs="$(MSBuildAllProjects);
            @(Compile);
            @(_CoreCompileResourceInputs);
            $(ApplicationIcon);
            $(AssemblyOriginatorKeyFile);
            @(ReferencePath);
            @(CompiledLicenseFile);
            @(LinkResource);
            @(EmbeddedDocumentation);
            $(Win32Resource);
            $(Win32Manifest);
            @(CustomAdditionalCompileInputs)"
    Outputs="@(DocFileItem);
             @(IntermediateAssembly);
             @(_DebugSymbolsIntermediatePath);
             $(NonExistentFile);
             @(CustomAdditionalCompileOutputs)"
    DependsOnTargets="$(BeforeCompileDependsOn)">

    <ItemGroup>
      <AssemblyInfoFiles Include="$(MSBuildProjectDirectory)\Properties\AssemblyInfo.cs"/>
    </ItemGroup>

    <PropertyGroup>
      <TfsBuildNumberExtract>$(TF_BUILD_BUILDNUMBER.Substring($([MSBuild]::Add($(TF_BUILD_BUILDNUMBER.IndexOf("_")),1))))</TfsBuildNumberExtract>
      <AssemblyFileBuildNumber>$(TfsBuildNumberExtract.Substring(2,$([MSBuild]::Subtract($(TfsBuildNumberExtract.IndexOf(".")),2))))</AssemblyFileBuildNumber>
      <AssemblyFileRevisionNumber>$(TfsBuildNumberExtract.Substring($([MSBuild]::Add($(TfsBuildNumberExtract.IndexOf(".")),1))))</AssemblyFileRevisionNumber>
    </PropertyGroup>

    <Message Text="TF_BUILD_BUILDNUMBER $(TF_BUILD_BUILDNUMBER)" Importance="High" />
    <Message Text="TfsBuildNumberExtract $(TfsBuildNumberExtract)" Importance="High" />
    <Message Text="AssemblyFileBuildNumber $(AssemblyFileBuildNumber)" Importance="High" />
    <Message Text="AssemblyFileRevisionNumber $(AssemblyFileRevisionNumber)" Importance="High" />

    <MSBuild.ExtensionPack.Framework.AssemblyInfo
      AssemblyInfoFiles="@(AssemblyInfoFiles)"
      AssemblyFileBuildNumber="$(AssemblyFileBuildNumber)"
      AssemblyFileBuildNumberType="NoIncrement"
      AssemblyFileRevision="$(AssemblyFileRevisionNumber)"
      AssemblyFileRevisionType="NoIncrement"
      />

  </Target>
</Project>
Using the ugly but effective MSBuild Property Functions , this code decompose the Build identifier and extract the number to use them for the Build and Revision part.
TFS 2012
TFS 2012 does not offer the environment variables: the only way to forward the build identifier is to customize the Build Template. For more information see Customize your build process template .
The code must be inserted before the Try Compile block.
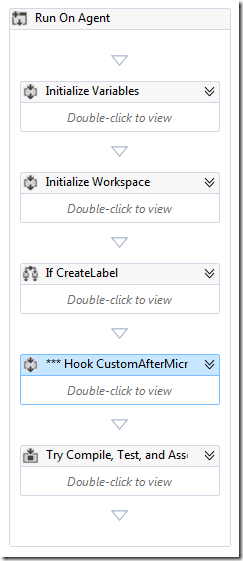
I use to mark my custom code with three asterisk so it is easy to spot and search.
The XAML code assumes that the targets file and Extension DLL are located in the same source control folder as the customized Build template.
<Sequence DisplayName="*** Hook CustomAfterMicrosoftCommonTargets 2010/2">
    <Sequence.Variables>
        <Variable x:TypeArguments="x:String" Name="customAfterMicrosoftCommonTargets" />
        <Variable x:TypeArguments="x:String" Name="localBuildTemplatePath" />
    </Sequence.Variables>
    <mtbwa:ConvertWorkspaceItem
        DisplayName="Convert BuildTemplate path to local"
        Input="[BuildDetail.BuildDefinition.Process.ServerPath]"
        Result="[localBuildTemplatePath]"
        Workspace="[Workspace]" />
    <Assign DisplayName="Assign customAfterMicrosoftCommonTargets">
        <Assign.To>
            <OutArgument x:TypeArguments="x:String">[customAfterMicrosoftCommonTargets]</OutArgument>
        </Assign.To>
        <Assign.Value>
            <InArgument x:TypeArguments="x:String" xml:space="preserve">[System.IO.Path.Combine(
        System.IO.Path.GetDirectoryName(localBuildTemplatePath),
        "autoIncrTfs2013.targets")]</InArgument>
        </Assign.Value>
    </Assign>
    <Assign DisplayName="Append CustomAfterMicrosoftCommonTargets to MSBuildArguments">
        <Assign.To>
            <OutArgument x:TypeArguments="x:String">[MSBuildArguments]</OutArgument>
        </Assign.To>
        <Assign.Value>
            <InArgument x:TypeArguments="x:String">[String.Format(
        "{0} /p:CustomAfterMicrosoftCommonTargets={1} "
        , MSBuildArguments
        , customAfterMicrosoftCommonTargets)]</InArgument>
        </Assign.Value>
    </Assign>
    <Assign DisplayName="Append TeamBuildNumber to MSBuildArguments">
        <Assign.To>
            <OutArgument x:TypeArguments="x:String">[MSBuildArguments]</OutArgument>
        </Assign.To>
        <Assign.Value>
            <InArgument x:TypeArguments="x:String">[String.Format(
        "{0} /p:TF_BUILD_BUILDNUMBER={1} "
        , MSBuildArguments
        , BuildDetail.BuildNumber)]</InArgument>
        </Assign.Value>
    </Assign>
</Sequence>
The ConvertWorkspaceItem translates the Build template path as a path on the local file system. Using that value computes the position of autoIncrTfs2013.targets, which is used to append the CustomAfterMicrosoftCommonTargets property to the MSBuild arguments.
I uploaded some sample code in BuildSample.AutoIncr.zip .
Caveat and considerations
The build workspace conserve history of the builds, and each Build Definition and each Agent use a different workspace. In other words, building the same Changeset on different Agents, may give different results.
What else can go wrong? A lot of things:
- if you lose the Binaries folder, i.e. the output directory, all projects gets recompiled;
- code generation must be controlled by proper MSBuild input and outputs, otherwise too much or not enough code is regenerated when a template changes;
- “wildcard” tools like WiX Heat or Web Site projects can pull-in files that have been deleted from version control but are still on the local workspace.
That said, incremental build could be extremely useful In some scenarios in a couple of scenarios:
- incremental builds can boost the speed of Continuous Integration;
- distributing hotfixes minimize download/deploy bandwidth;
- incremental changes are deployed with minimum recompiles and maximum speed.
In my opinion these are good application of this technique and the risks are worthwhile.
Hope you enjoyed the series and can apply fruitfully the methods I exemplified.