Increment Version for Changed Assemblies only – First part
23 Apr 2014 - Giulio Vian - ~4 Minutes
This is something I did in the past ( Build incrementale e numeri di versione [ITA] ), and it came out recently on Stack Overflow , so I will take the time to describe how to do this in details.
The solution is design around MSBuild: leveraging some extension points, you trigger the custom code that increments some version number in AssemblyInfo.cs, subject to the same conditions that triggers code compiling. Being MSBuild based it will work both on a local (desktop) build, and a Team Foundation Build; you must be careful selecting the correct options for your Build Definition, otherwise it will not function. In this post we will look at the basics of inject code in the standard MSBuild process, leaving the Team Build customization for the [next post]({% post_url 2014-04-25-increment-version-for-changed-assemblies-only-second-part %}). A good discussion about what version numbers are available and the best practices to manage them can be found in
Team Foundation Build Customization Guide
. This solution will not touch any Visual Studio / MSBuild project file (*.*proj) nor requires any change to a build server.
The basics
Let’s start analyzing how to intercept the standard compile process and inject a custom Task in it. The standard .Net compile process is designed with some extension points ready to use and since .Net 2; furthermore there are some properties to easily hook the extension points in a clean way (see
How to: Extend the Visual Studio Build Process
and
Common MSBuild Project Properties
for details). Strangely, the most powerful property is CustomAfterMicrosoftCommonTargets: supplying the path of an MSBuild file, all targets defined in your file redefine the default ones and add more.
Let’s see an example. Suppose you created a new Console Application project in the C:\Sample folder; running from the command line
MSBuild /property:CustomAfterMicrosoftCommonTargets=c:\Sample\custom.targets ConsoleApplication1.csproj
and assuming custom.targets contains
<?xml version="1.0" encoding="utf-8"?>
<Project xmlns="http://schemas.microsoft.com/developer/msbuild/2003">
  <Target Name="AfterCompile">
    <Message Text="*TRACE* AfterCompile intercepted!" Importance="high" />
  </Target>
</Project>
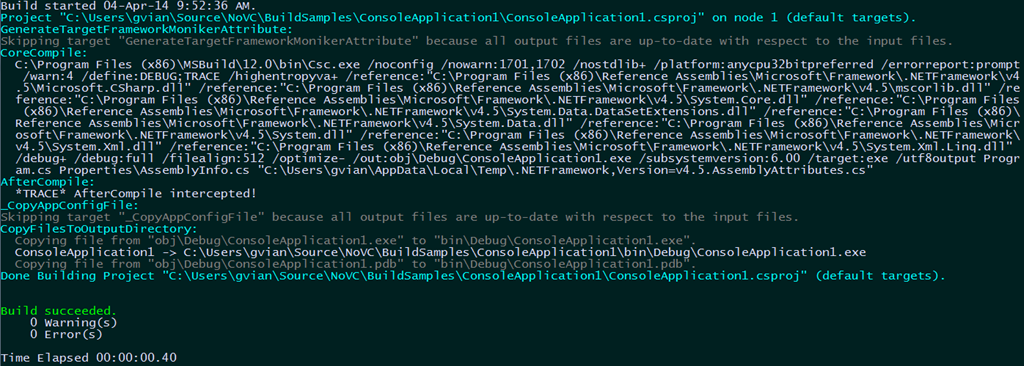
the output for the first run of the command is
you see that AfterCompile is redefined, and is executed after compiling the project.
Rerunning the command without touching any file gives a different output, as MSBuild is smart to not recompile when source is unchanged.
Note that our custom message appears in both scenarios.
MSBuild side
Now that we have seen the basics of intercepting the standard compile process, let’s see how to leverage this technique to control the versioning.
In order to see an updated version number on the executable, we have to select a target running before the target which compiles the project; also it must be run only if the project will be compiled. For this to happen, use the BeforeCompile target and specify the same Inputs and outputs that the CoreCompile target uses, as in the following MSBuild snippet.
<Target
    Name="BeforeCompile"
    Inputs="$(MSBuildAllProjects);
        @(Compile);
        @(_CoreCompileResourceInputs);
        $(ApplicationIcon);
        $(AssemblyOriginatorKeyFile);
        @(ReferencePath);
        @(CompiledLicenseFile);
        @(LinkResource);
        @(EmbeddedDocumentation);
        $(Win32Resource);
        $(Win32Manifest);
        @(CustomAdditionalCompileInputs)"
    Outputs="@(DocFileItem);
         @(IntermediateAssembly);
         @(_DebugSymbolsIntermediatePath);
         $(NonExistentFile);
         @(CustomAdditionalCompileOutputs)">
    <!-- increment task here -->
</Target>
The standard process computes the project inputs — source files, resources, referenced projects and DLLs — the project outputs — executables, PDBs, XML documentation files, etc — and compare the timestamps to see if outputs are out-of-date with respect to inputs. It is important to list the same set of files as CoreCompile, so MSBuild will trigger our target on the same condition used to compile the source. This code can be found in the %Program Files (x86)%\MSBuild\12.0\Bin\Microsoft.CSharp.CurrentVersion.targets file for MSBuild 12 (Visual Studio 2013 or later) or %SystemRoot%\Microsoft.NET\Framework\v4.0.30319\Microsoft.CSharp.targets (up to Visual Studio 2012 included).
Updating the Assembly version is easy thanks to the AssemblyInfo task of MSBuild Extension Pack .
<ItemGroup>
    <AssemblyInfoFilesToUpdate Include=”$(MSBuildProjectDirectory)\Properties\AssemblyInfo.cs”/>
</ItemGroup>

<MSBuild.ExtensionPack.Framework.AssemblyInfo
    AssemblyInfoFiles=”@(AssemblyInfoFilesToUpdate)”
    AssemblyFileBuildNumberType=”YearWeekDay”
    AssemblyFileRevisionType=”AutoIncrement”
    FirstDayOfWeek=”Sunday”
/>
In this snippet we collect the AssemblyInfo file contained in the Project’s Properties folder and feed it to the Task asking to set a build number using current date and to automatically increment the revision number; major and minor are left untouched. See the Task documentation for many more options. Only two DLLs are required: MSBuild.ExtensionPack.dll and Ionic.Zip.dll.
The code does not change the AssemblyVersion attribute: this is the most common option and in the
Team Foundation Build Customization Guide
you will find in depth information on the reasons.
In the next post we will see how to integrate these techniques in the Team Foundation Build process.


