Integrating Linux builds in TFS
13 Feb 2014 - Giulio Vian - ~4 Minutes
Once upon a time I had to set-up a demo about integrating TFS build with Linux builds. As many knows there aren’t out-of-the-box solutions: currently there are no agents for Linux, so I had to make up something. The solution is composed by the following elements:
- setup SSH on Linux
- write a Linux build script, saved in TFS version control
- modify the custom template using the Community Build Extensions adding these steps: a. push the script b. invoke the script from remote c. collect the build log(s) d. copy the logs to the OutDir I have not implemented the last two sub-items, but I’ll explain the other elements in detail.
Prepare the Build Server
You have to install PuTTY on the build server (precisely on the server running the TFS Build Agent). PuTTY is available at http://www.chiark.greenend.org.uk/~sgtatham/putty/download.html. This tool is an XCOPY install, so instead of modifying the machine, you can save the binaries in version control and get them from there. An easy way is to put them in a sub-folder with the Build Process Template.
Prepare the Linux machine
Create a user to connect from the Build Agent and run the build. On a Debian distro, the command is
adduser builder
Execute this command as root or prefix it with sudo.
For the demo, I decided to just use /tmp as the build working directory. This is a bad choice for a real solution, as this directory is automatically cleaned by the operating system.
Make sure that the language support is installed. In my case, I installed the C compiler running
apt-get install gcc
Build Process Template Customization
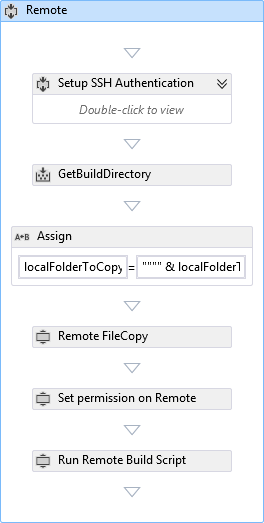
In TFS 2013, there are two different workflows according to the repository type: Git or TFVC. In the Community TFS Build Extensions you will find the actions to copy files and launch remote commands. They are wrappers around PuTTY, which must be available at execution time. In this example we replace the normal Visual Studio compile step with the launch of the remote Linux script. In other words the MSBuild action with the sequence of actions you see in the picture. This is identical for both kinds of template, Git or TFVC.
The steps are:
- Set the connection information
- Determine the location of the Linux files downloaded from version control to the Windows build server
- Copy these files in Linux
- Mark the copied script executable
- Run the remote build script
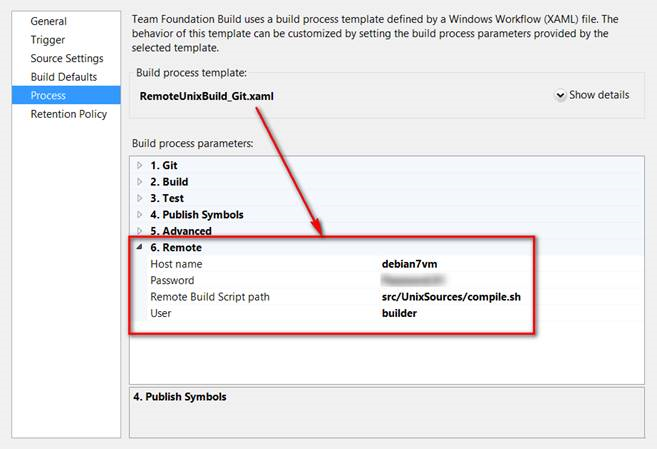
Note that the FileCopyRemote action can transfer files in both directions. The connection and the name of the Linux script are not fixed, but they are build parameters set in the Build Definition.
The XAML code follows.
<Sequence DisplayName="Remote">
<Sequence.Variables>
<Variable x:TypeArguments="x:String" Default="X:\Temp\*" Name="localFolderToCopy" />
<Variable x:TypeArguments="tas:SSHAuthentication" Name="sshAuth" />
</Sequence.Variables>
<Sequence DisplayName="Setup SSH Authentication">
<Assign DisplayName="Create SSH Authentication object">
<Assign.To>
<OutArgument x:TypeArguments="tas:SSHAuthentication">[sshAuth]</OutArgument>
</Assign.To>
<Assign.Value>
<InArgument x:TypeArguments="tas:SSHAuthentication">[New TfsBuildExtensions.Activities.SSH.SSHAuthentication]</InArgument>
</Assign.Value>
</Assign>
<InvokeMethod DisplayName="Set AuthType" MethodName="set_AuthType">
<InvokeMethod.TargetObject>
<InArgument x:TypeArguments="tas:SSHAuthentication">[sshAuth]</InArgument>
</InvokeMethod.TargetObject>
<InArgument x:TypeArguments="tas:SSHAuthenticationType">[TfsBuildExtensions.Activities.SSH.SSHAuthenticationType.UserNamePassword]</InArgument>
</InvokeMethod>
<InvokeMethod DisplayName="Set User" MethodName="set_User">
<InvokeMethod.TargetObject>
<InArgument x:TypeArguments="tas:SSHAuthentication">[sshAuth]</InArgument>
</InvokeMethod.TargetObject>
<InArgument x:TypeArguments="x:String">[sshUser]</InArgument>
</InvokeMethod>
<InvokeMethod DisplayName="Set Password" MethodName="set_Key">
<InvokeMethod.TargetObject>
<InArgument x:TypeArguments="tas:SSHAuthentication">[sshAuth]</InArgument>
</InvokeMethod.TargetObject>
<InArgument x:TypeArguments="x:String">[sshPassword]</InArgument>
</InvokeMethod>
</Sequence>
<mtbwa:GetBuildDirectory Result="[localFolderToCopy]" />
<Assign>
<Assign.To>
<OutArgument x:TypeArguments="x:String">[localFolderToCopy]</OutArgument>
</Assign.To>
<Assign.Value>
<InArgument x:TypeArguments="x:String">["""" & localFolderToCopy & "\*" & """"]</InArgument>
</Assign.Value>
</Assign>
<tas:FileCopyRemote
EnableCompression="{x:Null}" ErrorCode="{x:Null}" FailBuildOnError="{x:Null}" HasErrors="{x:Null}" IgnoreExceptions="{x:Null}" KnownHostsFile="{x:Null}" LogErrorToFile="{x:Null}" LogFileName="{x:Null}" Port="{x:Null}" PreserveFileAttributes="{x:Null}" Protocol="{x:Null}" ToolsPath="{x:Null}" TreatWarningsAsErrors="{x:Null}" Unsafe="{x:Null}"
Authentication="[sshAuth]"
DisplayName="Remote FileCopy" LogExceptionStack="True" OutputLoggingLevel="High"
Recursively="True" Source="[localFolderToCopy]"
Target="[String.Format("{0}@{1}:/tmp", sshUser, sshHost)]" />
<tas:InvokeRemoteScript
ErrorCode="{x:Null}" HasErrors="{x:Null}" IgnoreExceptions="{x:Null}" KnownHostsFile="{x:Null}" LogErrorToFile="{x:Null}" LogFileName="{x:Null}" Port="{x:Null}" ToolsPath="{x:Null}" TreatWarningsAsErrors="{x:Null}"
Authentication="[sshAuth]"
Command="["chmod +x /tmp/" & remoteBuildScript]"
DisplayName="Set permission on Remote Build Script" FailBuildOnError="True"
Host="[sshHost]" LogExceptionStack="True" OutputLoggingLevel="High" />
<tas:InvokeRemoteScript
ErrorCode="{x:Null}" HasErrors="{x:Null}" IgnoreExceptions="{x:Null}" KnownHostsFile="{x:Null}" LogErrorToFile="{x:Null}" LogFileName="{x:Null}" Port="{x:Null}" ToolsPath="{x:Null}" TreatWarningsAsErrors="{x:Null}"
Authentication="[sshAuth]"
Command="["/tmp/" & remoteBuildScript]"
DisplayName="Run Remote Build Script" FailBuildOnError="True"
Host="[sshHost]" LogExceptionStack="True" OutputLoggingLevel="High" />
</Sequence>
Build Scripts
My sample Linux build script is made up of just two lines.
cd /tmp/src/UnixSources
cc HelloWorld/hello.c
They don’t deserve explanation 
Execution
After a successful build that’s what you get.
Final words
I collected the code in this Zip file . I tested it on two virtual machines, one with TFS 2013, the other running Linux Debian 3.2.41-2 SMP x86_64.


